++ Get an additional 20% Off - Use Coupon Code RV20

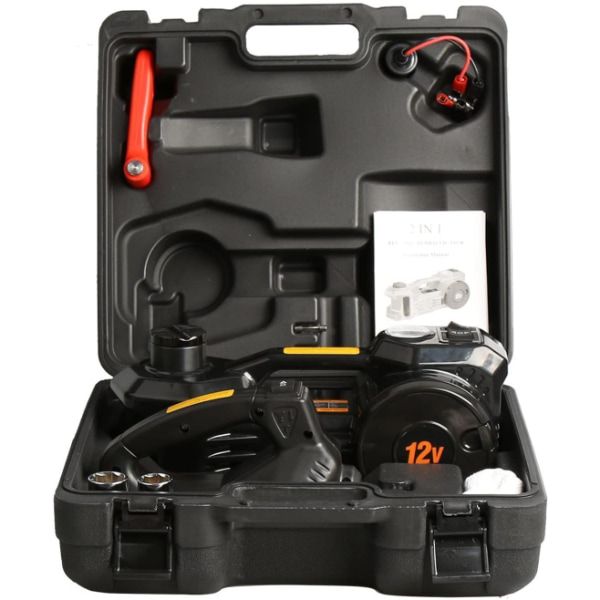
3-Ton 12V Electric Hydraulic Jack Kit with Impact Wrench & Inflator

CA$129.99
In stock
SKU
CJ-5-770

Our 3-Ton 12V Electric Hydraulic Jack Kit takes about one minute to reach a max height. A car jack is a necessary auto repair tool, especially when you are far away from vehicle repair shops or like long-distance travel. This car jack is suitable for sedans and SUVs under 3 ton, whether men or women can easily change the tire with ease in an emergent case. It is designed to save your effort and time, instead of tedious manual disassembly, just flick a switch, a car will be lifted, any adult can easily change the tire without asking for help from others or going to the car repair shop. The kit includes an electric hydraulic car jack, built-in air tire pump with needles and air hose, cigarette lighter power line, safety hammer, spare fuses and gloves.

Our 3-Ton 12V Electric Hydraulic Jack Kit takes about one minute to reach a max height. A car jack is a necessary auto repair tool, especially when you are far away from vehicle repair shops or like long-distance travel. This car jack is suitable for sedans and SUVs under 3 ton, whether men or women can easily change the tire with ease in an emergent case. It is designed to save your effort and time, instead of tedious manual disassembly, just flick a switch, a car will be lifted, any adult can easily change the tire without asking for help from others or going to the car repair shop. The kit includes an electric hydraulic car jack, built-in air tire pump with needles and air hose, cigarette lighter power line, safety hammer, spare fuses and gloves.

Specification:
  • Input Voltage: 12V DC
  • Rate Current: 13A
  • Rated Power: 150W
  • Max Loading: 3T (6614 lb)
  • Lifting Height Range: 5.9 - 17.7 inches
  • Power Cord Length: 11.5 feet
  • Max pressure: 150psi
  • Air hose length: 23.6 inches
Warning:
  1. Never use electric car jack on sloped ground, be sure to use it on flat ground
  2. Do not exceed the limit of load bearing capacity, the car jack is only applicable to vehicles within 3 ton, vehicles beyond 3 ton is not supported;
  3. To ensure sufficient electricity, it is better to start the vehicle before using the electric jack;
  4. When the electric car jack is working, please do not get too close to the car and touch it with your fingers to avoid personal injury;
  5. Please pay attention to the positive and negative terminals of the battery, do not reverse the position of the battery clips when connected to the car battery (DC 12V).

All orders ships within 24 hours.

Free shipping to the Canada and USA

RVcover.ca offers FREE Shipping with UPS / FEDEX / USPS on all orders to anywhere in Canada and the US.

Express and overnight shipping

RVcover.ca offers express and overnight shipping for all products, with rates starting at $25 for express shipping and $55 for overnight shipping, depending on the product weight. To receive your order faster, select the express or Overnight Shipping option at checkout. Please note that express and overnight shipping is not available for PO Box addresses.

International Shipping

RVcover.ca provides international shipping via FEDEX or USPS for a flat rate of $120. The delivery time typically ranges from 7 to 10 business days, although it may vary.

Tracking Number

Once you've placed your order, we'll send you an email confirmation with the carrier details and tracking number.

With numerous companies available, you may be wondering which one is the best choice and why.

Well, at RVcover.ca, we're confident that our covers are top-notch. The likelihood of you having to replace your cover is small, however, if you ever have any issues, our Lifetime Warranty has got you covered..

How does the warranty work?

Our warranty provides coverage against any defects in materials and craftsmanship, safeguarding your investment in our product. As the original purchaser, you have the opportunity to request replacement covers multiple times during your ownership tenure, provided you still retain possession of the item. It's important to note that this warranty is non-transferrable and applies exclusively to the original buyer.

Starting from the date of purchase, the warranty operates on a prorated basis. Therefore, if a replacement cover is required within a certain timeframe, there may be associated costs based on our prorated schedule.

It's important to note that RVcover.ca will never ask you to ship back a defective item.

To ensure smooth processing, we kindly ask you to keep your receipt or order ID for any warranty claims.

How to file a warranty claim?

Send us an email to Warranty@RVcover.ca and one of our agents can guide you through your claim. Make sure your email has: your full name, order ID, what's wrong, when it happened, and pictures showing the problem. We only handle warranty claims through email.

You can find additional information about our Warranty Policy in our Terms and Conditions.

Car Cover Installation Instruction:

  1. Position the cover over the vehicle ensuring the front side is facing you. The front can be identified by a tag, label, or logo.
  2. If your vehicle's antenna isn't retractable or removable, utilize the provided antenna patch with your cover. Refer to the ANTENNA PATCH INSTALLATION section below for details. When using the patch, ensure you pass the antenna through the cover first.
  3. If your cover comes with mirror pockets, fit them over the mirrors.
  4. Extend the cover over both the front and rear bumpers.

Car Cover Removal Instruction:

  1. Unhook the cover from beneath both the front and rear bumpers.
  2. Lift and fold both sides of the cover onto the vehicle's top, forming a strip about 2 feet (60 cm) in width.
  3. Beginning from the vehicle's front, fold the cover in sections of roughly three feet (1 meter) from the front towards the back.

Antenna Patch Installation:

If your antenna doesn't retract, our antenna patch is here to assist. It's straightforward to install and should take just a few minutes.

  1. Fit the cover onto your vehicle to identify the exact position where the antenna touches.
  2. The front of the cover is labeled with a tag. Begin by positioning this at the front, and then smoothly pull the cover towards the back of the vehicle.
  3. When you reach the point where the cover meets the antenna, mark this location.
  4. Carefully make a small cut at the marked spot for the antenna to pass through. It's best to keep the incision minimal to prevent external elements from penetrating under the cover.
  5. Align the antenna patch over this cut, allowing the antenna to slide through.
  6. The patch will restore the cover, ensuring it remains sealed and protected.

Cable Lock Installation:

The Cable Lock sets comprise the cable itself, the accompanying lock, and a key designed specifically for the lock. All of our car covers come equipped with two grommet holes situated at the bottom, in the middle, on both sides of the cover.

To use the steel cable effectively, it should be threaded through the loop at one end and securely fastened to itself at the opposite end, as illustrated. The cable is then passed beneath the vehicle, threading through the remaining grommet that is scratch-resistant, and finally, it is secured in place using the provided lock.

It's worth noting that the cable lock set is exclusively included with our Gold Shield 5L car cover only.
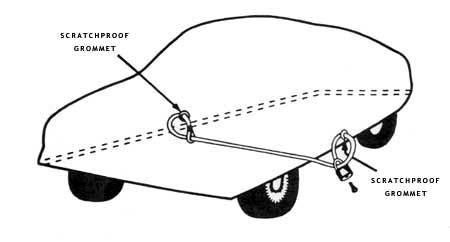
Cable Lock Installation

IMPORTANT WARNINGS:

WARNING TO OWNERS OF REPAINTED VEHICLE: Applying a cover to a newly painted surface might harm it. If your car has recently been painted, please consult with your painter or body shop regarding the guidelines for using this cover.

CAUTION IN FREEZING CONDITIONS: On rare occasions, if a heavy downpour is immediately followed by temperatures plummeting below freezing, the cover might freeze to an ice layer formed between the car and the cover. If this occurs, DO NOT forcefully remove the cover. Should you need to take the cover off, pour warm water over the car and gently lift the cover, inspecting both its surface and the vehicle's during the process. If you feel any resistance, halt immediately — this means the ice hasn't fully melted. Pour more warm water on the affected area and continue.

CAUTION IN WINDY CONDITIONS: If you're in areas with high winds or storing your vehicle for a long time, ensure you fasten the provided buckles to snugly fit the cover under both the car's front and rear. This should be done even if you're using the optional lock and cable. This cover isn't a substitute for a garage. In strong winds, regularly check for any loose flapping. If wind gets beneath the cover, it might dislodge it or cause damage to the cover itself.

ADDITIONAL TIPS:
  • Do NOT cover a wet vehicle
  • Do NOT cover a hot tail pipe
  • Do NOT cover a vehicle with the windows or sun/moon roof open.
  • Do NOT cover a vehicle that has recently been painted
  • Do NOT cover a vehicle that has just been painted.
  • If you've waxed your car, ensure that the vehicle is fully dry before installing the cover.
  • Do NOT cover a convertible vehicle with the top down
  • Do NOT cover a car directly after being driven. Let the car cold down before putting the car cover on.
  • Do NOT cover a car that has been exposed to the sun for an extended period. Ensure the vehicle has cooled down before putting on the cover.

Adhering to these guidelines is essential. We won't be accountable for any damage to your vehicle if these instructions aren't followed.

It is very important to take good care of your car cover so that the performance of the cover is not affected. Many contaminants such as dirt, grease, oil, etc. can be very harmful to the cover’s performance and it might even deteriorate the cover to the point that the water resistance become invalid. Therefore, we recommend that you regularly wash your cover so that it can protect your vehicle more effectively for longer period of time.

The car cover can be washed either by hand (recommended) or by washing machine.

To wash the cover by hand, simply install the cover on your vehicle and use a water hose to remove all the contaminants, then use a cloth with any multi-purpose cleaner to wash the cover. Apply the water again, then use can use a dry cloth or towel to dry out the cover or simply let it air dry.

For washing machine cleaning:

  • Use the largest washing machine possible (for very large vehicles, it is recommended to use industrial size machines).
  • Put in on GENTLE mode.
  • Use mild powder detergent to clean the cover with cold water. DO NOT use bleach or fabric softener.
  • Rinse the cover twice in order to remove all the detergent.
  • Cover must be air dry.